
Survey Quotas
What Is It?
In many surveys, it is important to be able to track the number of respondents who have completed the survey according to a particular profile of interest. For example, you may wish to keep track of how many males and females have completed the survey, and how many fall into certain age groups. Additionally, you may wish to apply limits on each profile group to ensure that your survey sample is balanced, and to avoid any extra costs if you are paying per completed interview. Applying quotas allows you to keep track of who has completed the survey and, if required, limit the number of people in particular categories.
|
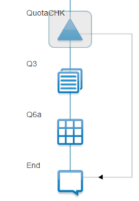
Quotas are indicated in the Designer Pane by a grey connector arrow. When the quota bucket that the respondent is allocated to is full, they will skip to the end of the survey and be flagged as "Finished Quota Full" in the data. |
How Do I Use This?
Setting up Quotas
The following example demonstrates how to set up a quota that limits completed surveys to 100 males and 100 females.
- Drag and drop a single response question object from the Toolbox to the Designer Pane.
- Enter the question text (if required) and answer codes into the Quick Update Box. If the question is going to be autocoded from a previous question, you will also need to enter the appropriate Action Commands (e.g. Recode).
- If the quota is to be used to limit the number of completed surveys, you will need to:
- Drag and drop an Instruction object from the Toolbox to the Designer Pane.
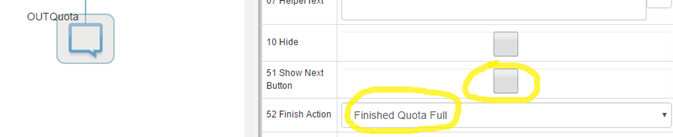
- This object will be the question that those that belong to a quota group that has already been filled will be directed to, so enter an appropriate message in the question text (e.g. "Unfortunately, you did not qualify for this research. Thank you for your time.")
- With the instruction object selected in the Designer Pane, select the Finished Quota Full from the Finish Action drop-down box in the Properties Pane and uncheck Show Next Button.
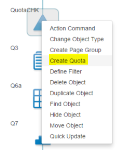
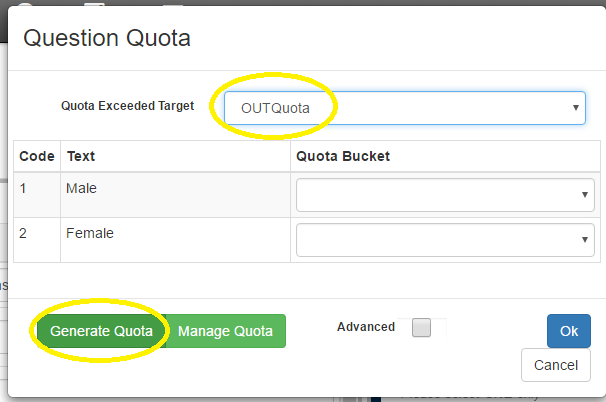
- Right mouse-click on the (single response) quota question and select Create Quota from the Quick Menu.
- In the Question Quotas dialogue box:
- Click on the Quota Exceeded Target Question drop-down box and select the instruction question to which respondents will skip once the quota groups have filled.

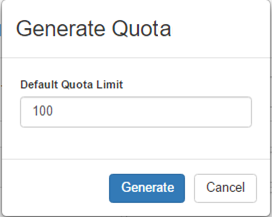
- Click on Generate Quota.
- Enter a default quota limit and click Generate. The number you type in here will be assigned to all quota groups - these can be individually changed later on.

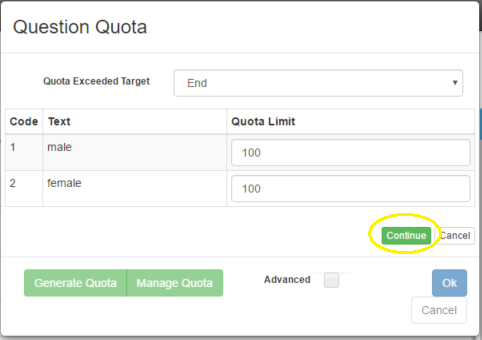
- To create the quota buckets, click Continue.

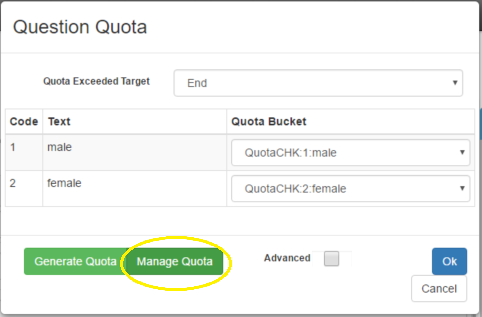
- If required, to change the quota limit for any individual bucket, click on Manage Quota, modify the quota limit, and click Continue.

- Click on the Quota Exceeded Target Question drop-down box and select the instruction question to which respondents will skip once the quota groups have filled.
- Click OK to exit the Question Quota dialogue box.

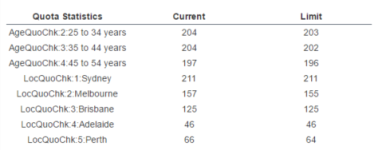
Monitoring Quotas
Once a survey has been published and launched, quotas can be monitored via the Control Panel.
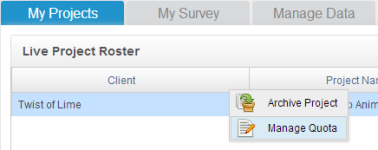
- Open the Control Panel and select your project from the Live Projects Roster on the My Projects Tab.
- Scroll down to the Live Survey Stats section to view the current statistics for each quota group.
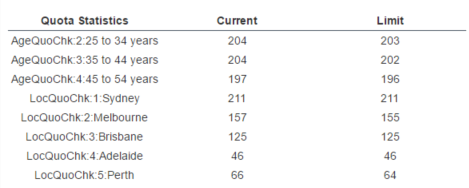
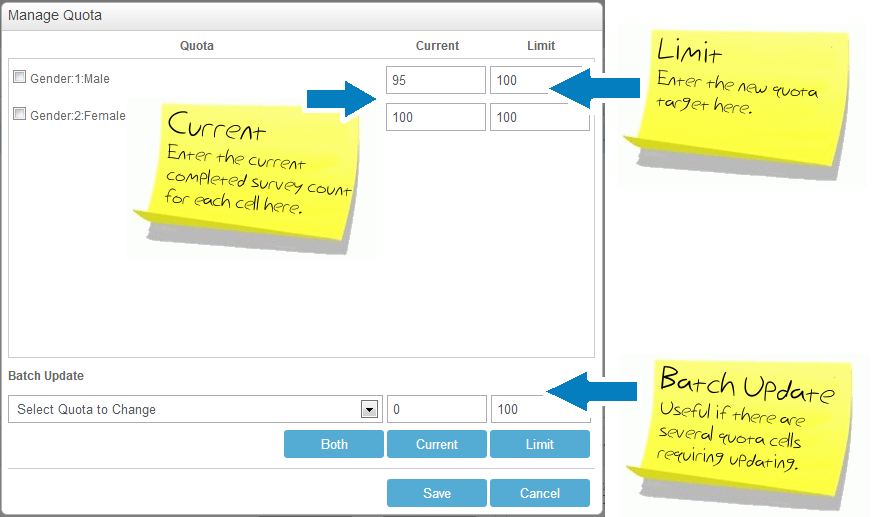
Modifying Quotas
Once a survey has been published and launched, quotas (both current counts and target limits) can be modified via the Control Panel.
- Open the Control Panel and select your project from the Live Projects Roster on the My Projects Tab.
- Right mouse-click on the project name and select Manage Quota.
- The current count of completed surveys in each quota cell, and/or the target limits for each cell may be modified via the Manage Quota dialogue box.

- Click Save to save the new quotas and exit the Manage Quota dialogue box.
Things to Consider
Once the quota has been reached, new respondents will be screened out of the survey. To avoid asking unnecessary questions, consideration should be given to placing the questions that determine the quota as close to the beginning of the survey as possible.
Testing quotas is not possible in preview or test mode. Therefore in order to check that the quotas are working as desired, you will need to publish the survey and test it via a live survey link.